
Adding VTEC to your D14, swapping heads
This is the biggest step of my (insane?) D14A3 project so far. It is based on the classic mini-me setup (D16Z6 head on D15B2/B7 block). Because I have a Civic City, I called this particular swap the City-me. This step followed right after my OBD1 conversion and it already ran 54.000 km without problems on a total of 244.000 km. Oil consumption improved because the state of the VTEC head seemed better compared to my old head. My car now uses 0.5 litre of oil in 10.000-15.000 km, so refilling is unneccessary between oil changes. Before I start with the swap itself, I want to tell why the head swap is usefull. As you might have observed the VTEC SOHC heads are almost identical to the non-VTEC SOHC heads. The combustion chambers are alike, the valves are the same, even the rockerarm assemblies can be interchanged! The resulting CR (compression Ratio) are (almost) identical, this in contradiction to mini-me swap on D15B2/B7 engines resulting in fairly high CR. So there really is only one reason to do it: to make VTEC possible. The non-VTEC heads can not be equipped (easily) with the VTEC system. So let’s swap and start with my shopping list.
Note: before doing the VTEC head swap you need the IM swap and OBD1 conversion!
Shopping lists for the headswap (parts I had):
-D16Y8 head, gives CR of ~9.5, D16Z6/Z9 head will be fine to and give CR ~9.1
-D16Z6 cam, D16Y8 will work fine to
-Megan adjustable cam gear, any brand will do
-OEM part 90741-657-000 or Woodruff key, (needed to mount cam gear)
-OEM part 12251-P2J-004 or headgasket D14A3/4, it is the same famous 3 layer from D16Y8 engines
-New coolant and oil
-Torque wrench!
Optional (and I had it):
-D16Z6 distributor (TD-42U) which actually only fits on the D16Z6/Z9 head, see later
-JDM:Password heatshield
Taking of the D14A3/A4 head
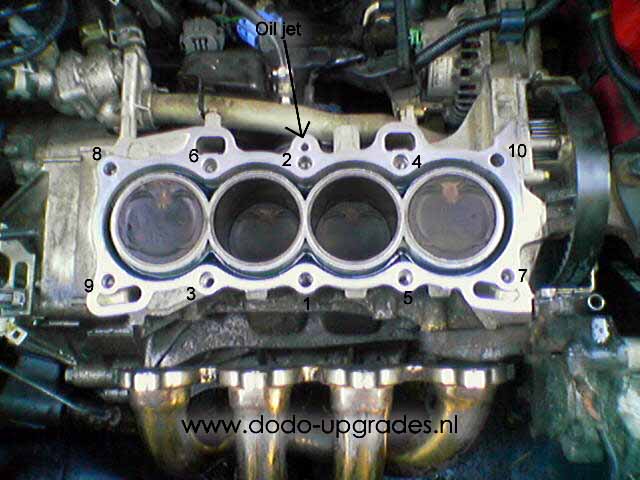
Start by removing all cables and hoses from the head. It is advised to remove all liquids from the engine. I didn’t. It can make a mess! Remove the valve cover. Removing the rocker arm assembly is not necessary. However, it can lighten the job and the timing belt is easier to handle that way. The rocker arm assembly can be removed by loosening 14 bolts in total, working from the outside to the inside. Sometimes the assembly will not come of easily. In that case I advise to turn over the cam shaft once (with the timing belt still on it!) and it will pop up. After removing the rocker arm assembly you can lift the cam shaft a little on the distrubutor side to remove the timing belt from the cam gear. Power steering lines are annoying, but let them were they are. Now the head is ready to be taken of. The head should be loosened with care to prevent bending and twisting. Always loosen the bolts one turn at a time working from bolt no. 10 to no.1 (see picture below), keep repeating this until the bolts are really loosened and take them all out. The same bolts can be reused later. Than the head can be taken of. Take care of the 2 centering rings that centre your head. They are placed around the 3nd and 5th bolt. My head looked like this after opening it up:
Mounting the VTEC head
People wondering about the so-called oil plug you have to remove from the oil jet when putting a VTEC head on a D15B2/B7 engine should wonder no longer. The oil plug simply isn’t there, so nothing to remove. Instead we can clean all the mess if any. I had spilled coolant on the pistons, you can see the coolant in the side pockets. After cleaning put on the new head gasket (never ever reuse head gaskets!) and install the two centering rings in holes 3 and 5 first. Gently put the VTEC head over the centering rings and place the head bolts back. Make sure no oil is left in the holes. However, the bolts should be a little greasy. This time you should work from no. 1 through no. 10. The head bolts should be tightened using a torque wrench. First apply 20 Nm of torque on all bolts, then 45 Nm and 67 Nm as last. Bolts no. 1 and 2. should be tightened a 4th time with the same 67 Nm.
Wiring VTEC
Wiring the VTEC solenoid should be very simple since one wire needs to be added for it. If the VTM (oil pressure sensor) is present two more wires need to be taken care of. One for the ECU signal and one for ground. See my page on VTEC connectors for the details.
Distributor
People wondering about the distributor needed, I assume all D-serie SOHC heads with the spark plugs at the front have interchangeable distributors. Sometimes a few wires can be changed or the internal timing is a bit different depending on the cam shaft used. The bolt pattern is always the same it seems. Except for the D16Z6/Z9 distributors. Those seem completely unfit for the other heads. The bolts do not line up at all. So that means I had a huge problem. Because I have the ‘normal’ D16Y8 head but a D16Z6 cam lies in it. First I put on a few TD-41U distributors (from D15B7) engines. Unfortunatly with the ECU ignition maps advanced 10 degrees and various distributors advanced to the max, the timing was 8 deg retarded at best. It should be 16 deg +/-2 BTDC, but I only managed to get 8 deg BTDC. My solution was to use a D16Z6 rocker arm assembly so a TD-42U distributor (from D16Z6) fitted on 1 bolt. This is the way I still drive. One bolt is not as safe as three, but it holds about 50.000 km already. And now the ignition can be adjusted perfectly.
Camshaft
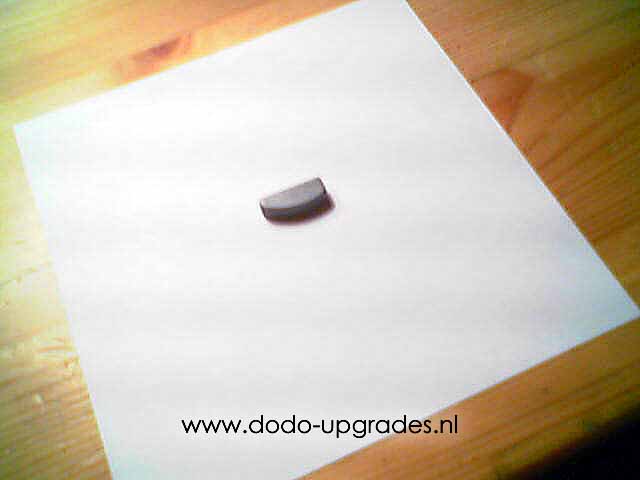
Now the cam shaft can be put into place. When using an aftermarket, adjustable cam gear, a Woodruff key is needed (see picture below) or the cam gear can not be mounted. When changing cam gears, 38 Nm of torque need to be put on the cam gear bolt. Normally, you can not apply this amount of torque holding the cam shaft some how. For now torque it down a little, 38 Nm of torque can be applied later when the timing belt is in place.
Timing
The timing belt does not need replacement. However if you need to, this is the right time. The timing belt needed is the normal 103 tooth D14A3/A4 timing belt. The main dimensions of the D14A3/A4 head are identical to D16Z6/Z9/Y8 heads and therefore the cam shaft is in the same spot relative to the crank shaft. The best way to put on the timing belt is the reversed way of taking it off. Lift up the cam shaft at the distributor side and slide on the timing belt. Make sure you got the timing right, this is one of the most crucial steps between succes and total failure regarding the bhp you get.
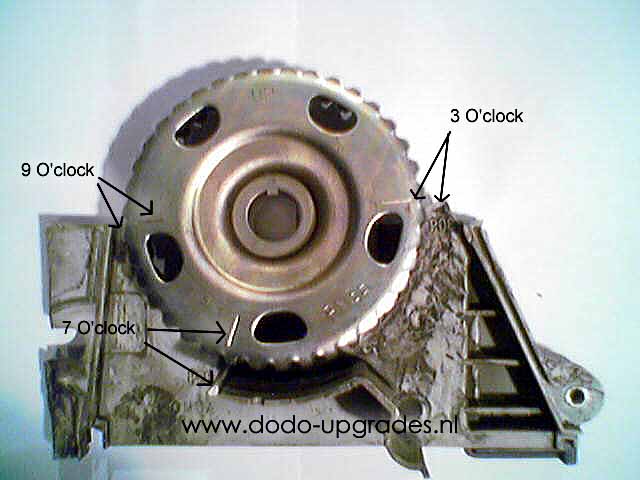
Let’s review normal timing on the D14A3 engine. On the PM3B cam gear used throughout many D-serie engines (D15B2/B7/Z1/Z3, D16Z6/Z9 and D14A3/A4 to name a few) there are three timing marks. I named them 3, 7 and 9 O’clock. It depends on the engine what combination of timing marks you need to focus on. Variations in cylinder head, deck height and crank gear timing can lead to three possibilities known by me.
On the crank pulley there are always four timing marks. Three of them are very close together with the middle one red. On the D14A3/A4 engines those marks are 10, 12 and 14 deg before top dead centre or BTDC. Those are needed for timing the ignition (see the OBD1 swap article). Now we need the fourth mark, a white stripe which is on TDC itself. The TDC mark should line up with another mark on the block. When done correctly the 1st and 4th piston should be up like in the first picture “block open” of this article. When the crank is exactly on TDC you can put the timing belt on the cam gear.
The cam gear of D14A3/D14A4 engines should be alligned using the 7 O’clock mark. Fortunatly this is the same for D16Z6/Z9 engines. So without an adjustable cam gear you can time the cam properly. However to get the maximum horsepower available you need one. Unfortunatly, most cam gears don’t come with 7 O’clock marks. Instead you should count the number of teeth. Personally I count from the bottom teeth, go 2 teeth clockwise and add 1/3rd tooth. Then it should be lined up with the 7 O’clock mark on the head. Now you should be able to torque the cam gear bolt down with 38 Nm.
Looking closer to the cam gear when mounted you will see it is impossible to align the crank at TDC and the cam at the 3 or 9 O’clock marks. Those marks are always a half tooth off. If considering a stock D15Z1 or D15Z3 engine for example, you will find that the 3 and 9 O’clock marks always line up and the 7 O’clock mark is impossible to reach. The third way of aligning known to me is for D15B2/B7 engines. For these engines the 3 and 9 O’clock marks should align with the top of the deck. There is no 7 O’clock mark on the head if I am correct. A D16Y8 engine has another cam gear, it is aligned at 3 and 9 O’clock marks, but the nipple is advanced a half tooth compared to the PM3B cam gear.
Rocker arm assembly
After mounting the cam gear and aligning the timing belt you can put the VTEC rocker arms on. Make sure all rocker arms are in their correct places, it can be difficult to keep 16 rocker arms up. And make sure all VTEC drums (the little cylinders found between the rocker arms) keep their place. The bolts of the rocker arm assembly should be torqued down going from the middle bolts to the outside bolts. The larger bolts should be torqued down to 22 Nm. The four smaller bolts at the sides should be torqued down to 10 Nm. As for the head bolts, make sure no oil puddle is left in the shafts. A little greas is no problem.
Valves
After placing the rocker arm assembly, the valves should be adjusted. Valves need to be adjusted with the engine cold, inlet valves 0.20 mm +/- 0.02, exhaust valves 0.25 mm +/- 0.02. Start with cylinder 1. The ‘up’ sign on the cam gear should face up. After adjusting the valves of cylinder 1, turn the cam 90 deg counter clockwise, the ‘up’ sign should face to the left, and adjust cylinder 3. Turn the cam further till the ‘up’ sign faces downwards and adjust cylinder 4. The last set of valves from cylinder 2 can be adjusted when the ‘up’ sign faces right. Note that the securing bolts on the rocker arms need 20 Nm of torque.
Turning the cam is very difficult with the rocker arm assembly mounted. You can turn the cam shaft using the cam gear bolt. However it might get loose from the resistance in the head. I always put the left front wheel of the car in the air, put the car in 5th gear and turn the wheel in order to turn the cam.
Finishing
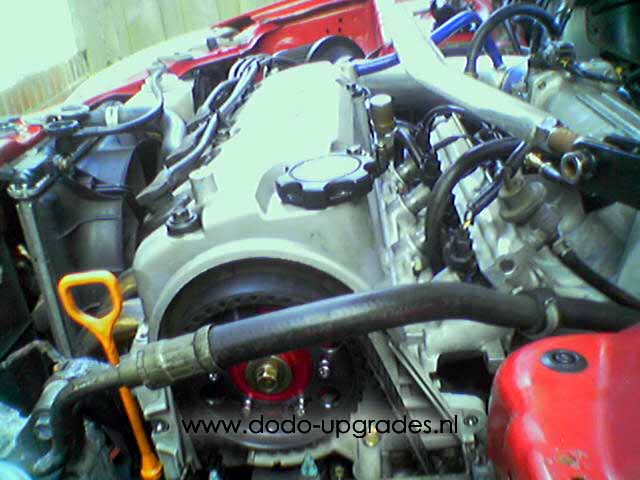
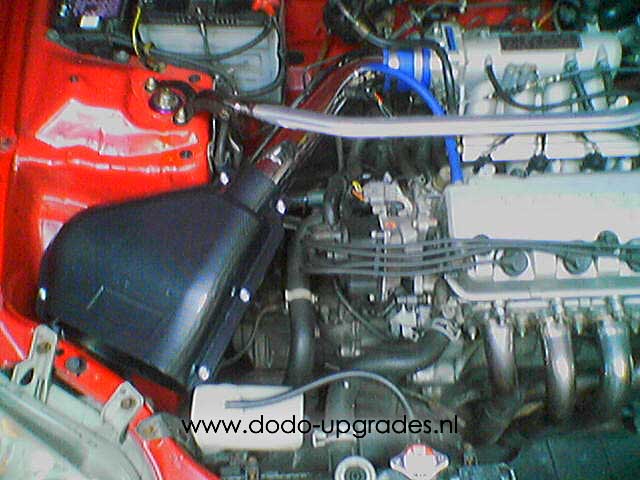
After mounting the valve cover (make sure you do not break these very fragile bolts, try to minimize the pressure on each bolt when turning down) my car looked like this. You can see my Megan cam gear (almost alike if not the same as Skunk2 pro-series?). I did not mount a cam gear cover at the time of the picture because I wanted to adjust the cam timing at the dyno first. Nowadays, I drive with the stock D14 cover. D16 cover will not fit because of the deck height. I recommend everybody to drive with a cam gear cover, timing belts can easily be damaged by incoming dirt, stones etc. A heatshield from JDM:Password was mounted to keep heat out of the IM. However, its functionality is doubted by many. The VTEC solenoid somewere in the back and the the cylinder head code (P2J-2 instead of P2A-6) are the only clues left that there is something special going on.
Results
During the first days of this car I had only 122 bhp, mainly because it was timed like a normal D16Z6 engine. Later on the dyno it was found that retarding the cam while keeping the ignition timing at the same level gained 11 bhp. The torque of the engine was not modified. However the rpms at which the torque occurred went up. After I bought a Zeitronix ZT2 wideband lambda and adjusted the air fuel mixture properly, as well as replacing the cat one additional run was performed once. This time 136.6bhp@7500rpm and 140Nm@6500rpm was the result.
After installing a Skunk2 intake manifold with 70 mm throttle body and re-installing the cat converter, the power band was identical up to 7000 rpm with the earlier made 133 bhp measurement. After 7000 rpm, 5 bhp was gain at 7700 rpm, resulting in 138 bhp. Torque was down again to about 135 Nm @ 6200 rpm. A bit disappointing, but I am convinced better numbers will come in the future.

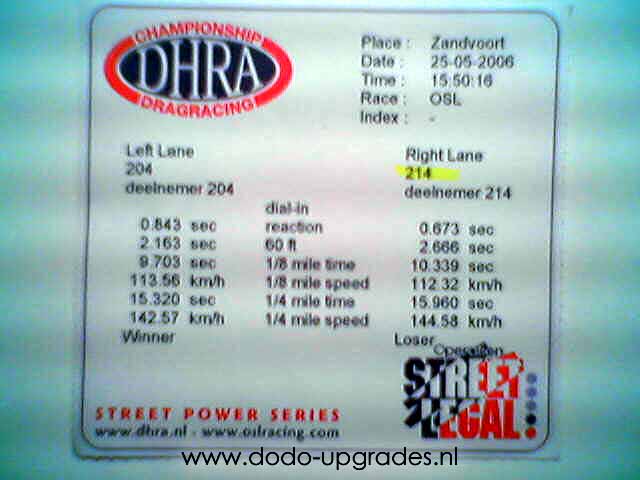
The VTEC point at this moment is very high, about 5600rpm, the dyno suggests that I even might try a later VTEC point.The next movie demonstrates my car when it had 133bhp. On the strip I drove a 15.960 at the 1/4 mile and 10.339 at the 1/8 mile.
And this movie shows a 100 to 170 km/h sprint in 3rd gear (silly rev limiter).
Somewhat later…
Below a recent picture of my engine bay is shown. In the background the Skunk2 stuff is visible and in the foreground a Simota aero form is seen. I bought this intake second-hand for its inlet tube so I could re-install the IAT sensor again for more constant temperature measurements. I tried the filter element with its fake carbon shield. The filter has a smaller filter area compared to classical open air filters and it has a very sharp edge on its inside (why can’t some of these manufacturers not bother to make a proper entry!?). So I figured the filter installed would be disappointing, but actually I have a very good feeling that no power is lost. On the other hand this filter could be installed more firmly (my old open air filter seems to have bend the metal a bit on the chassis were it was connected) and the looks are quite nice… I keep it this way. Maybe try to get a more descent filter.
Further improvement
Finally I bring you people my Skunk2 cam results, many know it already by email contact or so, but a year ago I reached 145.1 bhp using a Skunk 2 stage 1 cam for D16Z6 and valves + retainers to enable 8100 rpm. Time and priority on my site was low, but here is the dyno. The filter element in the mean time has been upgraded by an bigger K&N element to make sure the losses there are a minimum.
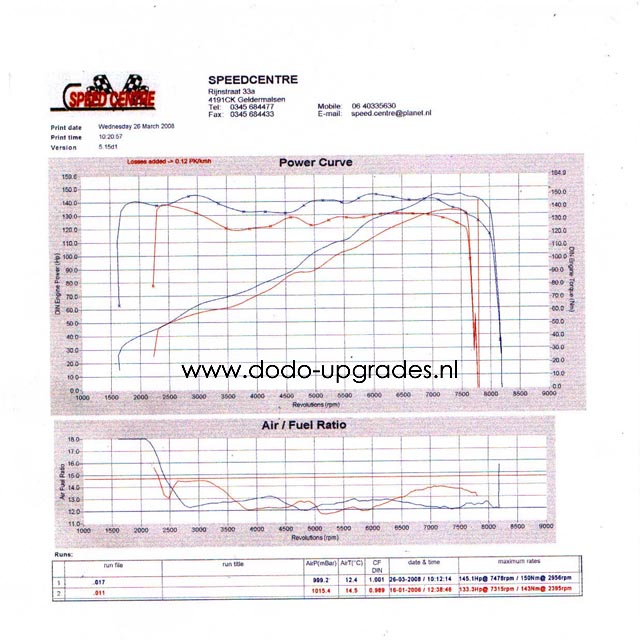
Unfortunately the S2 cam did not fit in my D16Y8 head right away, a small bit of material needed to be cut away for the 2nd and 3rd cylinder VTEC lobes. After installing the cam I installed Skunk2 springs and retainers so revs could go up to 8100 rpm. Right now it is 2020 and the engine still runs like its new…
With this setup I did enter a ¼ mile sprint contest, however no improvement was found! I still needed 16.0 seconds to reach the other end and the top speed was down from 144 kmh in 2006 to 137 kmh in 2008. Only reasons I can think of are: I dyno tuned with an adjustable FPR, later on I had CRX2 come over and map my ECU to use the OEM FPR. Mayby in that process something went wrong, but it didn’t feel that way. The other reason is that the car has been lowered by D2 springs (and aligned). In the past the back of the car was raised a few cm, I undid that by lowering the car to equal 12 cm ground clearance for and aft. Mayby that had such an impact on aerodynamics? Re-dynoing and re-aligning are considered.
Dodo Bizar
17 replies on “D14 VTEC”
Awesome project man! I wanna start this on my own Civic 97 and mine’s a D14A4 (the 90hp one). I was thinking of throwing in extra kinks in case I can’t find the spare parts anymore but I was wondering if it’s safe. The camshaft I can’t currently find stock anywhere other than aftermarket for a D16Z6 from Blox Racing which is currently the cheapest. I was actually giving the idea of a stock air filter a shot since cold air intake will be very sus to inspectors on tech inspection so I also wanted to ask if it’d destroy the whole project in any way. There is a bonus question there that is if you know whether the D16Z6 airbox fits the same filter size as the D14A4/3 airbox. Another problem is there’s no trace of any kind of throttle body of your required spec so I might either have to wait or keep my fingers crossed that the mechanic who will help me will have his own source. Unfortunately I didn’t yet research lots about the req’s for the OBD1 swap but I’m sure that could be worked out on the spot as from what I’ve seen it’s a bunch of cable work and a new chip. Hoping to take my beast to over 100hp at least and perhaps make it go further as I want it to stick around as one of my most prized memories (as my first project car).
Hi Bogdan, nice project. The full OBD1 and VTEC swap will very likely get you in the 130 bhp ballpark. I have hardly ever seen scores below that.
In the past stock camshafts came in with stock VTEC heads, so best would be to find a complete D16Z6 or D16Z9 head (or D16Y8)… but I guess any stage 1 cam will do a fine job as well. Except you may need to grind out the head a little as I head to do since 2 of the 4 VTEC lobes were hitting the head.
Stock air filter will work, it may limit performance slightly, but not drastically. Perhaps B16A2 has slightly larger tubing (no idea if that is the case or it is the same as D16Z6 etc.).
Unfortunately the filter size of D14A3/A4 is different, it only works for the ‘downflow manifold type’ engines.
As for the throttlebody, the reel is the only really different thing, you may be able to customize and fit your D14A4 throttle body, as I have worked with my D14A3 for a while as well. Only the gasket to be used I am not that sure… I guess the D16Z6 versions should work best. (It is written somewhere by somebody in the forum I know…)
Thanks a lot!
Gonna have to wait for summer for all of this to fall into place. I’m still at a crossroad as to whether I should go for this or to just turbo the engine. If it comes to and the VTEC shenanigan turns out to be the best option to stay street legal in my country as well, let’s just hope that whatever D16Z6/Y8 head I find has the camshaft included (I noticed that 2nd hand is typically the place to find these as spare parts). Getting a new base on the car too namely some Eibach springs (E4020-140) and some Bilstein yellow/blue dampers to complete the suspension for the time being. My current goal is to smash the 100hp marker and get to a modest score above that so I can get the git-gud-at-carrying-speed vibes rather than drag racing vibes.
Hello
I have a D14A8 in my Honda Civic mb2 2001 late model 90PS (Obd 2 I believe)
I have just recently purchased a jdm d15b vtec head what do I need to get this running could you provide me with a list of all the parts required I need to get this project completed
I have been looking at 75mm bore p29 high compression pistons to raise the CR levels to higher figures I’m assuming bigger injectors will be required
Any help with my project will be appreciated I am not chasing high bhp figures just want a really fast 1.4
Hey man, single stage VTEC? Can’t give you a definitive list since there are alwyas little details that are different from car to car. If you are unsure and really have to start from the beginning start with the intake manifold, then convert to OBD1 and at last put the VTEC head. But basically you have to sort out things like ECU conversion, distributor, IACV. Always check all parts and details you want to swap out and make the list yourself going. That should get you started. But rest assured there is alwyas the chance you missed something (gaskets, new gaskets! I forgot those at first maniswap…)
Great content man. I have a ’96 which started life as a D14A4 when I bought it as my first car back in 2001. I bought a D16Y8 head and intake manifold somewhere around late 2003, with the intention of doing this 1.4Vtec conversion… but a few months later I discovered I could insure a B18c swap, and so I changed my plan, and later sold both the 1.4 and the D16Y8 head, separately.
Reading this write-up … there are many little “gotchas”… I’m really curious if I’d ever have made it work…?
There was no information around back then about tuning or playing with the 1.4. I had planned to attack it based on what I could find about the US-centric “Mini-Me” swap, and write-ups on Honda-tech/Superhonda forums, for 1.5/1.6 SOHC +D16Y8/D16Z6 head.
The numbers you posted – what else was done besides the Vtec head?
Just Intake and exhaust? I have dyno sheets somewhere showing I think 110 and 114BHP from my little 1.4, with just intake and exhaust (2″ cat-back…loud and boomy, horrible on a long journey, but beautiful at low revs)…
Major nostalgia reading this – thank you
Thanks Brendan! That’s pretty much exact how I did it. Read mini-me write ups, read the mostly US forums with good info. And scavenge junk yard parts to try.
It is basically just I/H/E and Vtec head. But with aftermarket cams (otherwise 130+ was the limit).
Right now I am around 140 bhp depending on exact exhaust setup, I believe proper head work (high CR, porting) are required to have some more hp on high revs 6500-8000 range.
Hello,
Recently (last week) I bought my very first Honda. Ej9 hatch with d14a3. I began reading your posts about “spicying up the little d14.
My friend offered me complete d16z6 head including d16z6 distributor and d16z6 intake manifold+throttle body.
As I understood (my native language isn’t English so some places were difficult to understand clearly). I can use stock d16z6 head, IM, distributor, but I must do obd1 swap including ECU for d16z6 and I must change stock cam gear to adjustable one?
Thank You for answer!
Pretty much yes. As for the ECU, better have it chipped as well. Most OBD1 ECU’s can be made to handle VTEC. The D16Z6 ECU is the P28 and will work good. But the P06 is also a populair choice (D15B7 engine), needs VTEC modding, but can be used when done and chipped. Cam gear is strongly advised, but not a 100% must have.
Hallo
At First thank you for the nice Guide!
You (Admin) used a d14a3 (75hp).
But does it works with the d14a4 (90hp) (Bogdan)?
And whats with the d14z2 (90hp)?
Maybe Bogdan can give us a quick throwback to his head Swap.
Does it works? Any Problems?
Hey D14A3 and D14A4 are practically the same, so yes.
For D14Z2 I believe putting a VTEC head is physically the same, however the ECU hook-up is much easier since its more a regular OBD2b ECU. So the OBD1 conversion is much more straightforward than with D14A3/4.
Hello, great ti read about achieving these hp gains! So I am currently facing a major issue that is fuel economy. I recently bought a car which initially had a d16y8 single vtec and someone replaced only the head and block assembly of d14a3 so now it’s a cocktail. The car is clear on the throttle and reaches to limiters but it is running extremely rich maybe 3 km/l and gives black smoke.
By luck I have a d16y8 head lying around in my store so is there any way I can fix the gas mileage issue and run my car peacefully by replacing the head of my d14 a3 by d16y8 head with d16y8 management? looking forward for some expert opinions
Which ECU and injectors are you running now? My guess would be it has the D16Y8 injectors with D14A3 ECU… the D16Y8 injectors (brown/reddisch tip if you take them out) are 240 cc while the D14’s are 190 cc (blueish greenish tip color). Simply put, the injectors flow way too much in that case.
Hey, thanks for the reply, so later after my post I discovered that the trimming didn’t match between the d14a3 and d16y8 ecuwith wiring and injection.
Luckily I found wiring, distributor, ecu and injectors of d14a4 and replaced them. The car now runs a manual gearbox.
I am now willing to have some hp gains can I install the d16y8 head with intake manifold(which I believe can be modified for a d14a4 throttle) on d14a4 ecu. I don’t have the budget to do an obd1 from scratch now.
Also we had to off the immobilizer chip from the ecu, it now takes a bit longer self to start. It starts as soon as the check light comes on. On scanning, checklist gives error 19 which is for sensors on the gearbox because those sensors are not available in a manual gearbox. Have you faced any of this before? Kindly guide if possible
Hello! Great post
for a d16z6 Head on the d14a3 block is there any mods needed for the Intake manifold? Wiring sensors the same or different
Most are the same, its the changed/new stuff that needs attention, RACV to IACV. MAP is always the same. IAT/TA just doesn’t care if you got the wires mixed up. TPS usually is all the same… only D15B2 (and the likes from the early 90’s era) engines need to check TPS wiring.